DIY Outdoor Privacy Screen: Add Privacy for Under $120
Anúncios
Creating a DIY outdoor privacy screen offers an affordable solution to enhance your backyard’s seclusion, improving both comfort and property value without breaking the bank by using materials costing under $120.
Ready to transform your outdoor space into a private retreat? You can easily add privacy: DIY outdoor privacy screen for under $120. This affordable project not only enhances your backyard but also adds a touch of style without requiring professional help.
Anúncios
Why Build Your Own Outdoor Privacy Screen?
Building your own outdoor privacy screen is a fantastic way to personalize your outdoor area while addressing specific privacy concerns. It’s a cost-effective project that lets you customize the look and feel to match your existing decor.
With a simple DIY approach, you can control the materials, dimensions, and design elements, resulting in a unique privacy screen that perfectly suits your needs and preferences.
Anúncios
Cost Savings
One of the most significant advantages of a DIY privacy screen is the potential for cost savings. Professional installations and pre-made screens can be expensive.
- Materials: By sourcing your own materials, you can take advantage of sales, discounts, and repurposed items.
- Labor: DIY eliminates labor costs, as you’ll be doing the work yourself.
- Customization: Tailoring your design means you only buy what you need, minimizing waste and unnecessary expenses.
Building your own screen allows for targeted privacy solutions without overspending.
Customization Options
Designing and building a custom privacy screen lets you personalize every aspect to fit your unique style and needs. From choosing the right materials to adding decorative elements, the possibilities are endless.
- Material Selection: Opt for wood, bamboo, metal, or even recycled materials for a distinct look.
- Size and Dimensions: Create a screen that perfectly fits your space, whether you need a small corner piece or a full-length barrier.
- Design Elements: Add personal touches like paint, stain, climbing plants, or decorative panels.
Personalization leads to a more satisfying and visually appealing outdoor living space.
In conclusion, constructing your own outdoor privacy screen not only offers significant cost savings but also allows for unparalleled customization. By taking the DIY route, you can create a unique and functional addition to your backyard that perfectly fits your needs and aesthetic preferences.
Planning Your DIY Privacy Screen Project
Before diving into the construction of your DIY privacy screen, careful planning is crucial for a successful outcome. This includes assessing your needs, measuring your space, and choosing the right materials.
Proper planning ensures your finished screen is both functional and aesthetically pleasing, enhancing your outdoor area effectively.
Assessing Your Privacy Needs
The first step in planning your privacy screen is identifying the specific privacy issues you want to address. Consider what areas you want to shield from view and the level of privacy you desire.
Determine whether you need a full visual barrier, partial screening, or just a decorative element. Analyzing these needs will help guide your design and material choices.
Measuring Your Space
Accurate measurements are essential for ensuring your privacy screen fits perfectly within your outdoor area. Use a measuring tape to determine the length, height, and any other relevant dimensions of the space.
Consider any obstacles or features that might impact your screen’s placement, such as trees, existing structures, or uneven ground. Precise measurements will save time and prevent costly mistakes.
Choosing the Right Materials
Selecting the right materials is critical for the durability, appearance, and cost-effectiveness of your privacy screen. Consider factors such as weather resistance, maintenance requirements, and aesthetic appeal.
- Wood: Offers a natural look, but requires regular sealing or painting for protection.
- Bamboo: Eco-friendly and lightweight, but may need treatment to prevent insect damage.
- Metal: Durable and low-maintenance, but can be more expensive and may rust if not properly treated.
Wood is generally the most cost-effective option, so wood is recommended for keeping your screen under $120.
In summary, meticulous planning is essential for a successful DIY privacy screen project. Evaluating your privacy needs, taking precise measurements, and selecting appropriate materials will collectively contribute to a functional and aesthetically pleasing outdoor addition.
Affordable Material Options for Your Screen
Keeping your DIY privacy screen project under $120 requires smart material choices. Focus on readily available, cost-effective options that still provide adequate privacy and aesthetic appeal.
By exploring budget-friendly materials, you can achieve your privacy goals without exceeding your financial constraints.
Repurposed Wood Pallets
Repurposed wood pallets are an excellent budget-friendly option for creating a rustic and functional privacy screen. Pallets are often available for free or at a low cost and can be easily transformed with a bit of creativity and effort.
You can disassemble the pallets and use the individual boards to construct a solid or slatted screen, depending on your desired level of privacy.
Bamboo Fencing
Bamboo fencing is an affordable and eco-friendly choice for adding privacy to your outdoor space. Bamboo panels are lightweight, easy to install, and provide a natural, tropical aesthetic.
Look for bamboo fencing rolls at your local home improvement store or online retailer. Cut and attach the bamboo to a frame made from inexpensive lumber for a sturdy and attractive screen.
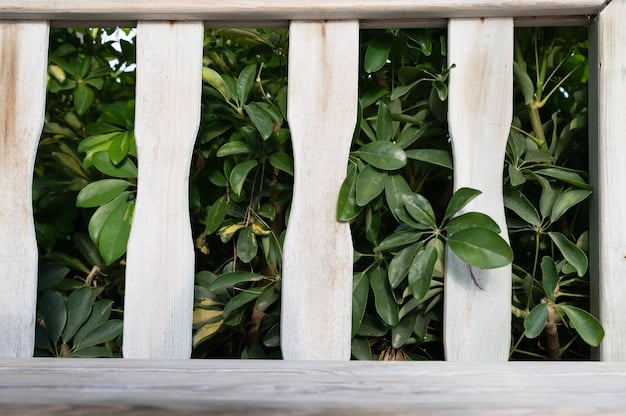
Lattice Panels
Lattice panels are another budget-conscious option that can provide both privacy and visual interest. These panels are typically made from wood or plastic and feature a crisscross pattern that allows for partial screening.
- Affordability: Lattice panels are generally inexpensive and easy to find.
- Installation: They can be easily attached to a wooden frame or posts.
- Versatility: Add climbing plants for enhanced privacy and a touch of greenery.
Consider lattice panels for a lightweight and versatile privacy solution.
In conclusion, several affordable material options can help you construct a DIY privacy screen for under $120. Repurposed wood pallets, bamboo fencing, and lattice panels each offer unique benefits and can be tailored to fit your specific needs and aesthetic preferences.
Step-by-Step Guide to Building Your Screen
Now, let’s get into how to actually build your DIY outdoor privacy screen. This step-by-step guide can simplify the construction process and ensure a successful outcome.
With patience, some basic tools, and these instructions, you can create a privacy screen that enhances your outdoor space without breaking the bank.
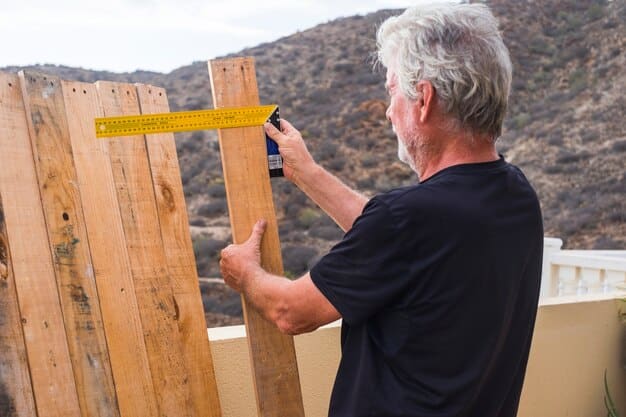
Step 1: Prepare Your Materials
Begin by gathering all the necessary materials and tools. This includes your chosen screening material (wood, bamboo, lattice), lumber for the frame, screws, nails, a saw, drill, measuring tape, and safety glasses.
Prepare your work area by clearing any obstacles and laying down a protective surface. Ensure you have all components ready for easy access.
Step 2: Construct the Frame
Build the frame for your privacy screen using the lumber you’ve selected. Cut the wood to the desired dimensions, ensuring each piece is square and even. Assemble the frame using screws or nails, creating a sturdy rectangular structure.
Consider adding support beams or crossbars for added stability, especially if your screen will be tall or wide.
Step 3: Attach the Screening Material
With the frame constructed, proceed to attach your chosen screening material. If using wood, space the boards evenly and secure them to the frame with screws or nails. For bamboo, wrap the fencing around the frame and fasten it with staples or wire.
- Lattice: Secure the lattice panel to the frame using screws or staples.
- Wood: Ensure even spacing between boards for a consistent look.
- Bamboo: Wrap and secure tightly for optimal privacy.
Take your time to ensure a neat and professional finish.
In summary, constructing a DIY privacy screen involves three key steps: material preparation, frame construction, and attachment of the screening material. By following these steps carefully, you can create a beautiful and functional addition to your outdoor area.
Adding Style and Personal Touches
Once your privacy screen is built, it’s time to add personal touches that reflect your unique style and enhance the overall aesthetic of your outdoor space. These finishing touches can transform a basic screen into a stunning focal point.
With a few creative ideas and minimal effort, you can make your privacy screen truly your own.
Paint or Stain for a Custom Look
Applying paint or stain to your privacy screen is a simple way to customize its appearance. Choose colors that complement your existing outdoor decor or add a pop of contrast for visual interest.
Ensure the surface is clean and dry before painting or staining. Apply multiple coats for a durable finish.
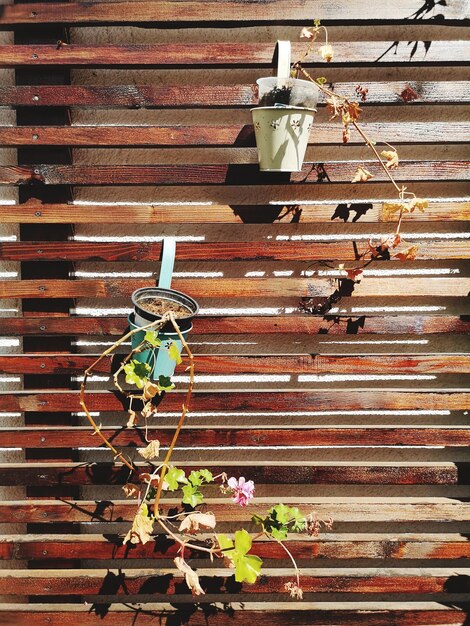
Incorporate Climbing Plants
Adding climbing plants to your privacy screen enhances its beauty and adds a natural element. Choose plants that are well-suited to your local climate and provide adequate coverage.
- Vines: Train vines to climb along the screen for a lush, green backdrop.
- Flowers: Select flowering plants to add color and fragrance.
- Maintenance: Prune and care for the plants regularly to maintain their appearance.
Climbing plants create a living, breathing privacy screen.
Add Outdoor Lighting
Enhance the ambiance of your outdoor space by incorporating lighting into your privacy screen design. String lights, lanterns, or spotlights can create a warm and inviting atmosphere.
Consider solar-powered lights for an energy-efficient option. Arrange the lights to highlight the screen’s features and create a cozy environment.
In conclusion, adding style and personal touches to your privacy screen can elevate its aesthetic appeal and create a more inviting outdoor space. Paint or stain for a custom look, incorporate climbing plants for a natural touch, and add outdoor lighting for enhanced ambiance.
Maintaining Your Privacy Screen
Proper maintenance is essential for prolonging the life of your DIY privacy screen and keeping it looking its best. Regular cleaning, inspection, and repairs will ensure its longevity and functionality. Neglecting upkeep can lead to deterioration and reduced privacy.
Implementing a consistent maintenance routine is the key to enjoying your outdoor privacy screen for years to come.
Regular Cleaning
Cleaning your privacy screen regularly removes dirt, debris, and mildew that can accumulate over time. Use a soft brush or cloth and a mild soap solution to scrub the surface gently.
Rinse thoroughly with water and allow the screen to dry completely. Avoid using harsh chemicals or abrasive cleaners that can damage the material.
Inspect for Damage
Periodically inspect your privacy screen for signs of damage, such as cracks, warping, or loose fasteners. Address any issues promptly to prevent further deterioration.
- Wood: Check for rot, insect damage, and splitting.
- Bamboo: Look for cracks or fraying.
- Fasteners: Tighten loose screws or nails.
Early detection and repair can save time and money in the long run.
Repair and Replace Damaged Parts
When you discover damage, take immediate steps to repair or replace the affected parts. Replace rotten wood, repair cracks with wood filler, or replace damaged panels entirely.
Use weather-resistant materials and fasteners for repairs to ensure durability. Paint or stain repaired areas to match the rest of the screen.
In conclusion, consistent maintenance is essential for preserving the beauty and functionality of your outdoor privacy screen. Regular cleaning, thorough inspection, and timely repairs will keep your screen looking its best for years to come.
| Key Point | Brief Description |
|---|---|
| 💰 Cost Savings | DIY screens reduce expenses on materials and labor. |
| 🛠️ Customization | Personalize size, materials, and design elements. |
| 🌱 Material Options | Use pallets, bamboo, or lattice for affordability. |
| 🎨 Personal Touches | Add paint, climbing plants, and lighting. |
FAQ
▼
You’ll need basic tools such as a saw, drill, measuring tape, screwdriver, and safety glasses. Having a level and a sander can also be helpful for a professional finish.
▼
Use pressure-treated lumber for the frame and consider adding cross supports. Secure the screen well to the ground or an existing structure to prevent tipping.
▼
Cedar, redwood, and pressure-treated pine are excellent choices for outdoor projects. They are naturally resistant to rot and insects, ensuring a longer lifespan.
▼
Inspect your screen at least twice a year, in the spring and fall, to check for damage or wear. Clean it as needed, and reapply paint or stain every one to two years.
▼
While primarily for privacy, a dense wooden screen can somewhat reduce noise. Consider adding soundproofing blankets if noise reduction is a primary concern for your project.
Conclusion
Building your own DIY outdoor privacy screen for under $120 is an achievable and rewarding project that can transform your outdoor space. By carefully planning, choosing affordable materials, and adding personal touches, you can create a functional and stylish screen that enhances your privacy and complements your home’s decor.


